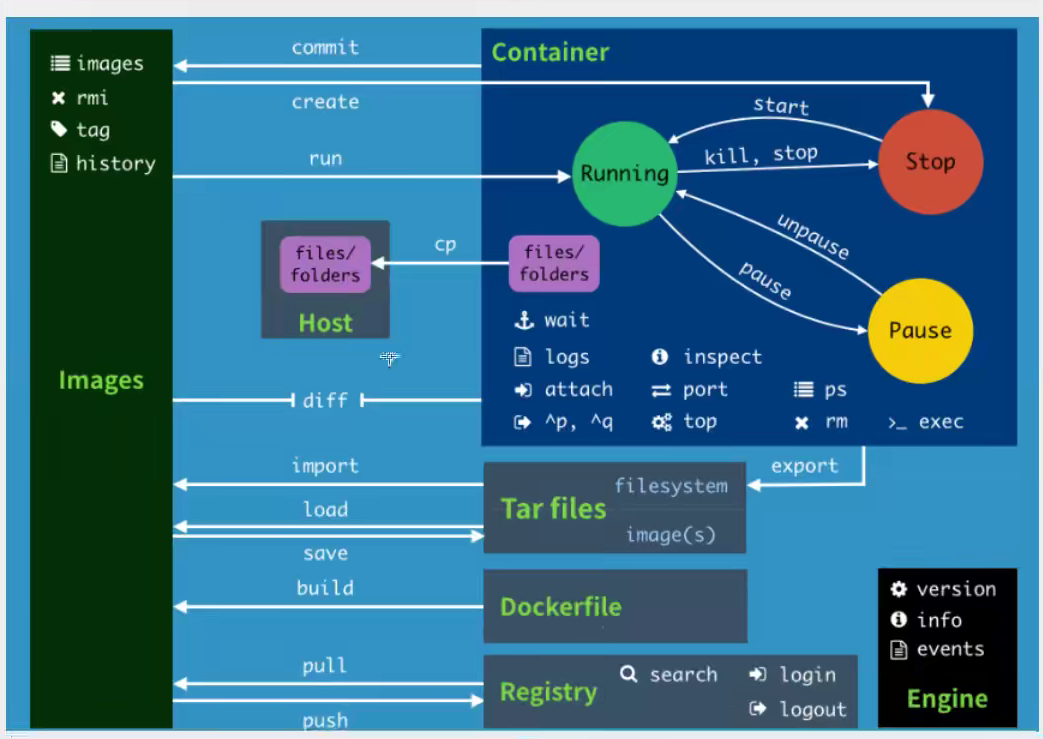
Docker常用命令-容器命令

docker version 显示docker的版本信息
docker info 显示docker的系统信息,包含镜像和容器数量
docker --help帮助命令
Usage:
docker [OPTIONS] COMMAND [arg...]

docker daemon [ --help | ... ]

docker [ --help | -v | --version ]

A
self-sufficient runtime for containers.

Options:
--config=~/.docker              Location of client config files  #客户端配置文件的位置

-D, --debug=false               Enable debug mode  #启用Debug调试模式

-H, --host=[]                   Daemon socket(s) to connect to  #守护进程的套接字(Socket)连接

-h, --help=false                Print usage  #打印使用

-l, --log-level=info            Set the logging level  #设置日志级别

--tls=false                     Use TLS; implied by--tlsverify  #

--tlscacert=~/.docker/ca.pem    Trust certs signed only by this CA  #信任证书签名CA

--tlscert=~/.docker/cert.pem    Path to TLS certificate file  #TLS证书文件路径

--tlskey=~/.docker/key.pem      Path to TLS key file  #TLS密钥文件路径

--tlsverify=false               Use TLS and verify the remote  #使用TLS验证远程

-v, --version=false             Print version information and quit  #打印版本信息并退出

Commands:

attach    Attach to a running container  #当前shell下attach连接指定运行镜像

build     Build an image from a Dockerfile  #通过Dockerfile定制镜像

commit    Create a new image from a container's changes  #提交当前容器为新的镜像

cp    Copy files/folders from a container to a HOSTDIR or to STDOUT  #从容器中拷贝指定文件或者目录到宿主机中

create    Create a new container  #创建一个新的容器,同run 但不启动容器

diff    Inspect changes on a container's filesystem  #查看docker容器变化

events    Get real time events from the server#从docker服务获取容器实时事件

exec    Run a command in a running container#在已存在的容器上运行命令

export    Export a container's filesystem as a tar archive  #导出容器的内容流作为一个tar归档文件(对应import)

history    Show the history of an image  #展示一个镜像形成历史

images    List images  #列出系统当前镜像

import    Import the contents from a tarball to create a filesystem image  #从tar包中的内容创建一个新的文件系统映像(对应export)

info    Display system-wide information  #显示系统相关信息

inspect    Return low-level information on a container or image  #查看容器详细信息

kill    Kill a running container  #kill指定docker容器

load    Load an image from a tar archive or STDIN  #从一个tar包中加载一个镜像(对应save)

login    Register or log in to a Docker registry#注册或者登陆一个docker源服务器

logout    Log out from a Docker registry  #从当前Docker registry退出

logs    Fetch the logs of a container  #输出当前容器日志信息

pause    Pause all processes within a container#暂停容器

port    List port mappings or a specific mapping for the CONTAINER  #查看映射端口对应的容器内部源端口

ps    List containers  #列出容器列表

pull    Pull an image or a repository from a registry  #从docker镜像源服务器拉取指定镜像或者库镜像

push    Push an image or a repository to a registry  #推送指定镜像或者库镜像至docker源服务器

rename    Rename a container  #重命名容器

restart    Restart a running container  #重启运行的容器

rm    Remove one or more containers  #移除一个或者多个容器

rmi    Remove one or more images  #移除一个或多个镜像(无容器使用该镜像才可以删除,否则需要删除相关容器才可以继续或者-f强制删除)

run    Run a command in a new container  #创建一个新的容器并运行一个命令

save    Save an image(s) to a tar archive#保存一个镜像为一个tar包(对应load)

search    Search the Docker Hub for images  #在docker
hub中搜索镜像

start    Start one or more stopped containers#启动容器

stats    Display a live stream of container(s) resource usage statistics  #统计容器使用资源

stop    Stop a running container  #停止容器

tag         Tag an image into a repository  #给源中镜像打标签

top       Display the running processes of a container #查看容器中运行的进程信息

unpause    Unpause all processes within a container  #取消暂停容器

version    Show the Docker version information#查看容器版本号

wait         Block until a container stops, then print its exit code  #截取容器停止时的退出状态值

Run 'docker COMMAND --help' for more information on a command.  #运行docker命令在帮助可以获取更多信息
容器命令:
如拉取一个Centos 7.9.2009容器
docker pull centos:7.9.2009
新建并启动容器
所需要的命令主要为 docker run。
docker run [可选参数] image

# 参数说明
--name="名字"           # 指定容器名字 比如 tomcat01 tomcat02 用来区分容器
-d                     # 后台方式运行(守护态运行) 比如 linux nohup
-it                    # 使用交互方式运行,进入容器查看内容
-p                     # 指定容器的端口 -p 8080:8080
    -p # ip:主机端口:容器端口-->配置主机端口映射到容器端口
    -p # 主机端口:容器端口(常用)
    -p # 容器端口
-P                     # 随机指定端口(大写的P)
例如,下面的命令输出一个 “hello glj”,之后终止容器。
docker run centos:7.9.2009 /bin/echo 'hello glj'
# hello glj
下面的命令则启动一个 bash 终端,允许用户进行交互。
[root@gzbsc001 ~]# docker run -it centos:7.9.2009 /bin/bash
[root@8805d737bdc8 /]# cat /etc/redhat-release
CentOS Linux release 7.9.2009 (Core)
[root@8805d737bdc8 /]#
守护态运行(后台方式运行):
docker run -d image
测试实例,后台运行,输出hello glj:
[root@gzbsc001 ~]# docker run -d centos:7.9.2009 /bin/sh -c "while true; do echo hello glj; sleep 1; done"
e17466a361666b6dd6247a258b7edc497f88edca92f93613bc5fd2f9107c2c56
输出结果可以用 docker logs 容器id 查看日志
查看日志:
# 常用:
docker logs -tf 容器id
-f : 跟踪日志输出
-t : 显示时间戳
docker logs --tail number 容器id #num为要显示的日志条数
--tail :仅列出最新N条容器日志(必须加上数量number)
如输出10条日志,并且监控动态:
docker logs -ft --tail 10 e17466a36166
退出容器
exit停止并退出容器(后台方式运行则仅退出)
Ctrl+p+q 不停止容器退出
列出所有的运行的容器
docker container ls or docker ps
#docker ps
     # 列出当前正在运行的容器
-a   # 列出所有容器的运行记录
-n=? # 显示最近创建的n个容器
-q   # 只显示容器的编号
删除容器
可以使用 docker container rm 容器Id or docker rm 容器id 来删除一个处于终止状态的容器
docker rm 容器id                 #删除指定的容器,不能删除正在运行的容器,强制删除使用 rm -f
docker rm -f $(docker ps -aq)   #删除所有的容器
docker ps -a -q|xargs docker rm #删除所有的容器
如果要删除一个运行中的容器,可以添加
-f参数。Docker 会发送SIGKILL信号给容器。
启动和停止容器
docker start 容器id or docker container start 容器id          #启动容器
docker restart 容器id or docker container restart 容器id      #重启容器
docker stop 容器id or docker container stop 容器id            #停止当前运行的容器
docker kill 容器id or docker container kill 容器id            #强制停止当前容器
查看容器中进程信息
docker top 容器id or docker container top 容器id
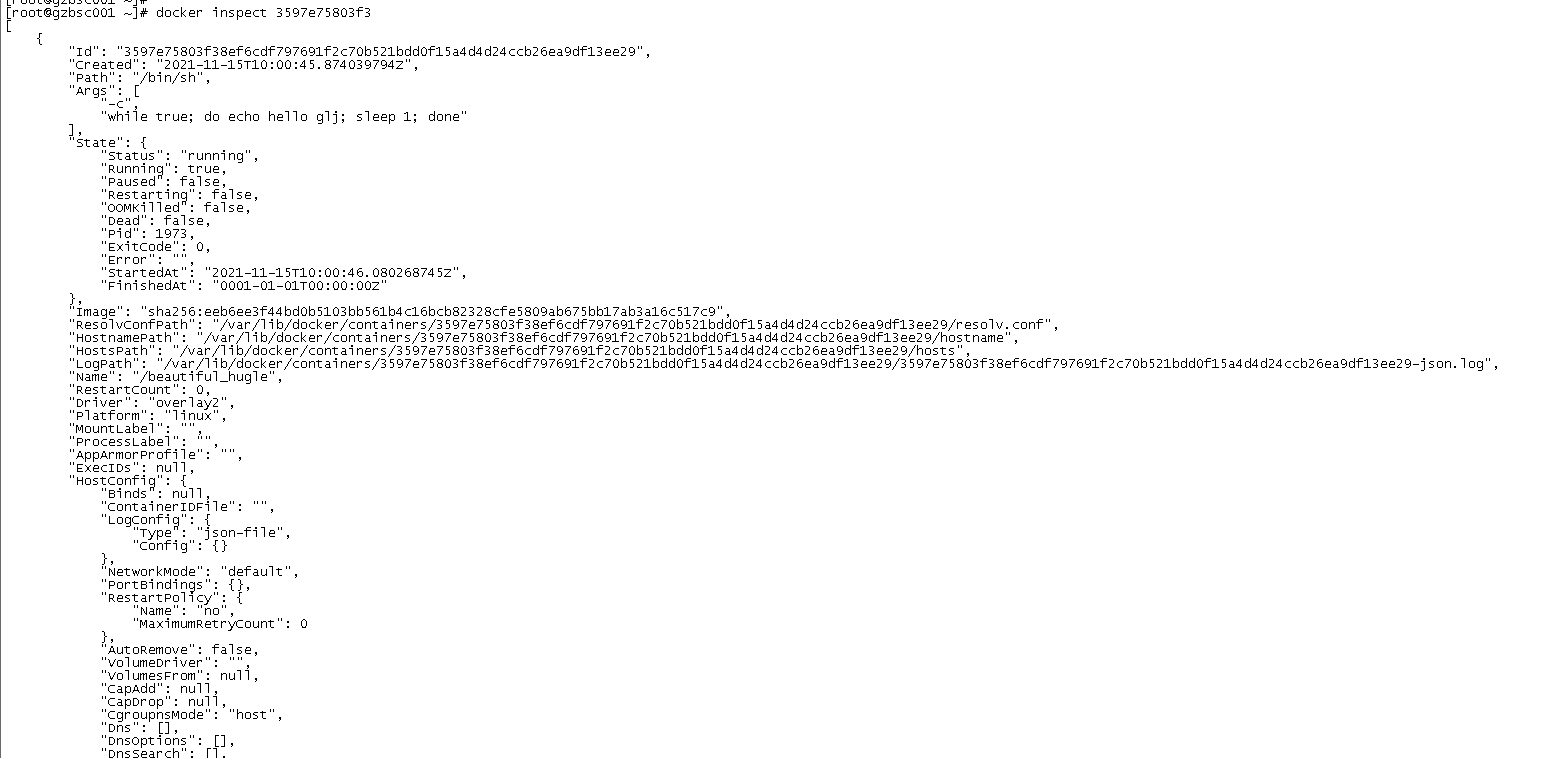
查看容器的元数据
docker inspect 容器id or docker container inspect 容器id

进入当前运行的容器
在使用 -d 参数时,容器启动后会进入后台。
某些时候需要进入容器进行操作,包括使用 docker attach 命令或 docker exec 命令,推荐大家使用 docker exec 命令.
docker exec进入容器后开启一个新的终端,可以在里面操作docker attach进入容器正在执行的终端,不会启动新的进程
attach 命令
docker attach 容器id
[root@gzbsc001 ~]# docker ps -a
CONTAINER ID   IMAGE             COMMAND                  CREATED          STATUS          PORTS     NAMES
3597e75803f3   centos:7.9.2009   "/bin/sh -c 'while t…"   44 minutes ago   Up 44 minutes             beautiful_hugle
[root@gzbsc001 ~]#
[root@gzbsc001 ~]# docker attach 3597e75803f3
exec 命令
docker exec 容器id
-i -t 参数
docker exec 后边可以跟多个参数,这里主要说明 -i -t 参数
只用 -i 参数时,由于没有分配伪终端,界面没有我们熟悉的 Linux 命令提示符,但命令执行结果仍然可以返回。
当 -i -t 参数一起使用时,则可以看到我们熟悉的 Linux 命令提示符。
[root@gzbsc001 ~]# docker ps -a
CONTAINER ID   IMAGE             COMMAND                  CREATED          STATUS          PORTS     NAMES
3597e75803f3   centos:7.9.2009   "/bin/sh -c 'while t…"   46 minutes ago   Up 46 minutes             beautiful_hugle
[root@gzbsc001 ~]#
[root@gzbsc001 ~]#
[root@gzbsc001 ~]# docker exec -it 3597e75803f3 /bin/bash
[root@3597e75803f3 /]#
[root@3597e75803f3 /]# pwd
/
[root@3597e75803f3 /]# cat /etc/redhat-release
CentOS Linux release 7.9.2009 (Core)
[root@3597e75803f3 /]#
拷贝容器的文件到主机中
docker cp 容器id:容器内路径 目的主机路径
# 进入 正在运行的容器
[root@gzbsc001 ~]# docker exec -it 3597e75803f3 /bin/bash

[root@3597e75803f3 /]# cd /home/
[root@3597e75803f3 home]# ll
total 0
[root@3597e75803f3 home]#
[root@3597e75803f3 home]# pwd
/home
[root@3597e75803f3 home]#
# 在/home 目录创建一个文件
[root@3597e75803f3 home]# touch glj.java
[root@3597e75803f3 home]# ll
total 0
-rw-r--r-- 1 root root 0 Nov 15 10:52 glj.java
[root@3597e75803f3 home]#
# 退出当前容器
[root@3597e75803f3 home]# read escape sequence
[root@gzbsc001 ~]#
# 查询正常运行的容器
[root@gzbsc001 ~]# docker ps
CONTAINER ID   IMAGE             COMMAND                  CREATED          STATUS          PORTS     NAMES
3597e75803f3   centos:7.9.2009   "/bin/sh -c 'while t…"   51 minutes ago   Up 51 minutes             beautiful_hugle
[root@gzbsc001 ~]#

# 执行负责命令
[root@gzbsc001 ~]# docker cp 3597e75803f3:/home/glj.java /home
[root@gzbsc001 ~]#

[root@gzbsc001 ~]# cd /home/
[root@gzbsc001 home]# ll
总用量 4
-rw-r--r--   1 root root    0 11月 15 18:52 glj.java
drwx------. 16 hcxt hcxt 4096 10月 20 17:34 hcxt
容器的导出和导入
导出容器:
如果要导出本地某个容器,可以使用 docker export 命令。
docker export eaaaaf132de3 > nginx02.tar
这样将导出容器快照到本地文件。
导入容器快照:
可以使用 docker import 从容器快照文件中再导入为镜像,例如
cat nginx02.tar | docker import - nginx/nginx:latest
[root@sdw34 tmp]# docker images
REPOSITORY     TAG        IMAGE ID       CREATED          SIZE
nginx/centos   7.9.2009   a5eea87b9379   34 seconds ago   140MB
练手demo
1.安装nginx
# 查询nginx镜像
docker search nginx
# 拉去nginx镜像
docker pull nginx
#查询是否拉取成功
docker images
    REPOSITORY   TAG        IMAGE ID       CREATED        SIZE
    nginx        latest     04661cdce581   5 days ago     141MB
    centos       7.9.2009   eeb6ee3f44bd   2 months ago   204MB
    java         8          d23bdf5b1b1b   4 years ago    643MB

# 指定端口
docker run -d --name nginx01 -p:3344:80 nginx
# 随机端口
docker run -d --name nginx02 -P nginx
# 查询生成的随机端口
docker ps
CONTAINER ID   IMAGE             COMMAND                  CREATED             STATUS             PORTS                                     NAMES
8f761ebdd2e2   nginx             "/docker-entrypoint.…"   7 seconds ago       Up 6 seconds       0.0.0.0:49153->80/tcp, :::49153->80/tcp   nginx02
# 测试是否能连上
curl 127.0.0.1:3344
curl 127.0.0.1:49153

#进入nginx02容器
docker exec -it nginx02 /bin/bash

# 挂载宿主目录到镜像中,nginx 配置信息在容器中的位置
-->日志位置:/var/log/nginx/
-->配置文件位置:/etc/nginx/
-->项目位置:/usr/share/nginx/html

# 创建宿主的 nginx 配置信息
[root@gzbsc001 tmp]# mkdir docker_nginx
[root@gzbsc001 tmp]# cd docker_nginx/
[root@gzbsc001 docker_nginx]# mkdir log
[root@gzbsc001 docker_nginx]# ll
drwxr-xr-x 2 root root 4096 11月 15 20:10 log

# 将docker环境的nginx容器的一些配置信息 copy到刚创建的对应目录中去
docker cp 8f761ebdd2e2:/etc/nginx/nginx.conf /data01/tmp/docker_nginx/
docker cp 8f761ebdd2e2:/etc/nginx/conf.d /data01/tmp/docker_nginx/conf.d/
docker cp 8f761ebdd2e2:/usr/share/nginx/html /data01/tmp/docker_nginx/html

# 将8f761ebdd2e2(nginx02)的nginx容器 停止删除(强制删除)
docker stop 8f761ebdd2e2
docker rm 8f761ebdd2e2
# 或者
docker rm -f 8f761ebdd2e2

# 再次启动nginx容器并挂载目录
docker run --name nginx02 -d -p 8888:80 \
-v /data01/tmp/docker_nginx/log:/var/log/nginx \
-v /data01/tmp/docker_nginx/nginx.conf:/etc/nginx/nginx.conf \
-v /data01/tmp/docker_nginx/conf.d:/etc/nginx/conf.d \
-v /data01/tmp/docker_nginx/html:/usr/share/nginx/html \
nginx

# docker ps 查看是否启动成功
[root@gzbsc001 html]# docker ps
CONTAINER ID   IMAGE             COMMAND                  CREATED             STATUS             PORTS                                   NAMES
eaaaaf132de3   nginx             "/docker-entrypoint.…"   7 seconds ago       Up 7 seconds       0.0.0.0:8888->80/tcp, :::8888->80/tcp   nginx02

# 测试
[root@gzbsc001 html]# curl http://127.0.0.1:8888
<!DOCTYPE html>
<html>
<head>
<title>Welcome to nginx!</title>
2.安装一个图形化管理工具Portaniner
Portaniner是Docker的图形化管理工具,类似的工具还有Rancher(CI/CD再用)
下载运行Portaniner镜像并运行,设置本机映射端口为9088
docker run -d -p 9088:9000 --restart=always -v /var/run/docker.sock:/var/run/docker.sock --privileged=true portainer/portainer
3.安装Mysql
docker pull mysql:5.7
#启动
docker run --name mysql001 -p 13306:3306 -v /home/mysql/data:/var/lib/mysql -e MYSQL_ROOT_PASSWORD=123456 -d mysql:5.7