zabbix5.0安装步骤
因为新公司需要用到zabbix,所以我这边还是利用五一假期回顾一下吧
安装部署zabbix监控架构
部署环境:
系统:CentOS7
web应用:Nginx
php 7.2
mariadb/mysql5.7及以上
服务端安装步骤
关闭selinux
sudo sed -i 's/SELINUX=enforcing/SELINUX=disabled/g' /etc/selinux/config
检查是否关闭成功
getenforce
关闭防火墙
systemctl stop firewalld && systemctl disable firewalld
yum -y install iptables-services && systemctl start iptables && systemctl enable iptables && iptables -F && service iptables save
下载源
官方
rpm -Uvh https://repo.zabbix.com/zabbix/5.0/rhel/7/x86_64/zabbix-release-5.0-1.el7.noarch.rpm
阿里
rpm -Uvh https://mirrors.aliyun.com/zabbix/zabbix/5.0/rhel/7/x86_64/zabbix-release-5.0-1.el7.noarch.rpm
更改源地址
sed -i 's#http://repo.zabbix.com#https://mirrors.aliyun.com/zabbix#' /etc/yum.repos.d/zabbix.repo
清理yum 缓存并查看源仓库
yum clean all
yum makecache
安装zabbix的服务端和客户端
yum -y install zabbix-server-mysql zabbix-agent
安装zabbix的web前端
安装software collections 便于后续管理高版本的PHP
yum install centos-release-scl -y
修改zabbix的前端仓库
vim /etc/yum.repos.d/zabbix.repo
        [zabbix-frontend]
        name=Zabbix Official Repository frontend - $basearch
        baseurl=http://repo.zabbix.com/zabbix/5.0/rhel/7/$basearch/frontend
        enabled=1                                  #由 0 ---->1
        gpgcheck=1
        gpgkey=file:///etc/pki/rpm-gpg/RPM-GPG-KEY-ZABBIX-A14FE591
安装zabbix前端
yum install zabbix-web-mysql-scl zabbix-nginx-conf-scl -y
安装数据库(已存在mysql,我这边步骤省略了)
快速的可百度一下吧
yum install -y mariadb-server
启动mariadb并加入开机自启
systemctl start mariadb
systemctl enable mariadb
创建数据库
create database zabbix character set utf8 collate utf8_bin;
创建用户并且授权
create user 'zabbix'@'%' identified by 'zabbix';
select user,host from mysql.user;
grant all privileges  on zabbix.* to "zabbix"@'%';
flush privileges;
导入MySQL数据
zcat /usr/share/doc/zabbix-server-mysql-5.0.14/create.sql.gz|mysql -uzabbix -p zabbix
修改zabbix-server配置文件
vim /etc/zabbix/zabbix_server.conf
    DBHost=localhost
    DBName=zabbix
    DBUser=zabbix
    DBPassword=zabbix
    DBPort=3306
修改zabbix前端配置(nginx配置)
vim /etc/opt/rh/rh-nginx116/nginx/conf.d/zabbix.conf取消注释并设置listen端口和server_name
修改php-fpm配置文件
vim /etc/opt/rh/rh-php72/php-fpm.d/zabbix.conf
# 修改一下内容:
listen.acl_users = apache,nginx
php_value[date.timezone] = Asia/Shanghai # 更改时区
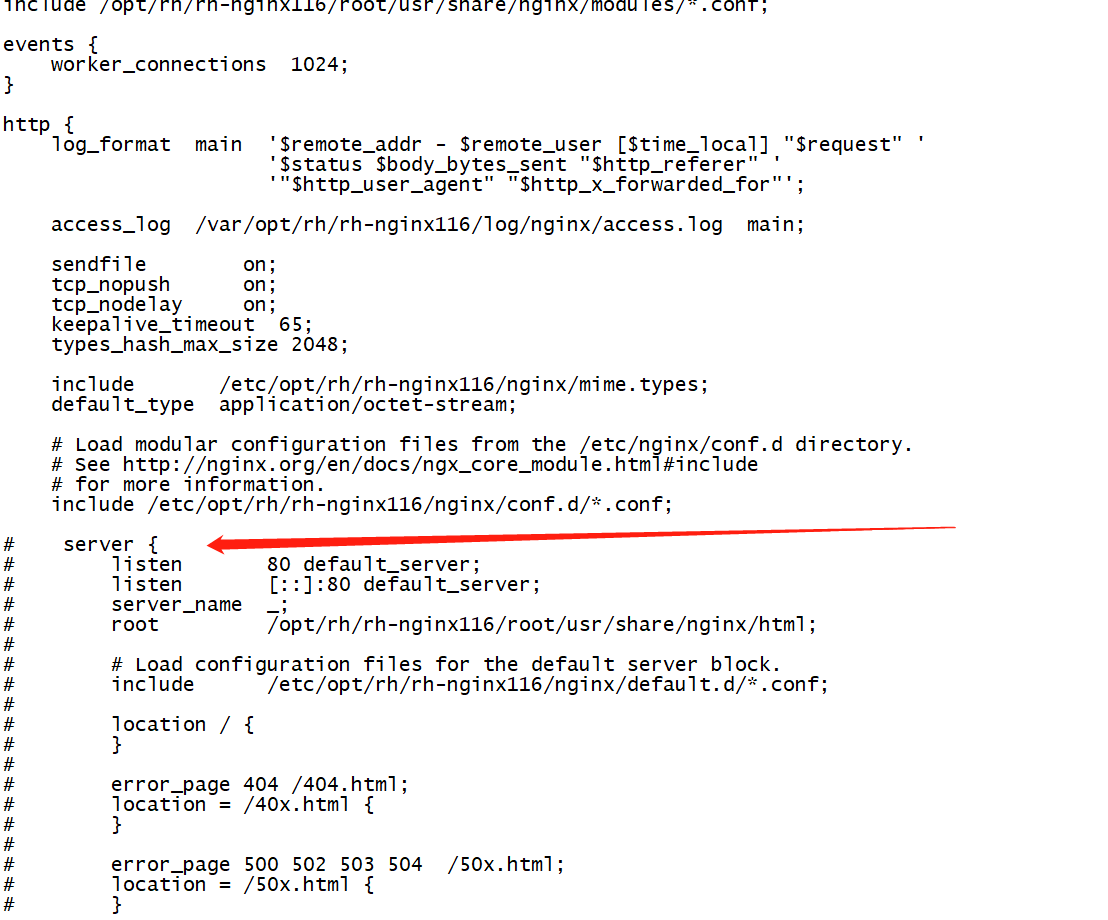
修改nginx配置文件注释掉server模块
- 如果不修改nginx的配置文件,则默认访问是Red Hat software默认的Nginx页面,我们现在需要改成zabbix的访问页面
vim /etc/opt/rh/rh-nginx116/nginx/nginx.conf

启动zabbix和php/nginx服务
启动服务并加入开机自启
systemctl start zabbix-server zabbix-agent rh-nginx116-nginx rh-php72-php-fpm
systemctl enable zabbix-server zabbix-agent rh-nginx116-nginx rh-php72-php-fpm
访问前端页面
http://server_ip-
登入默认账号密码:
Admin/zabbix
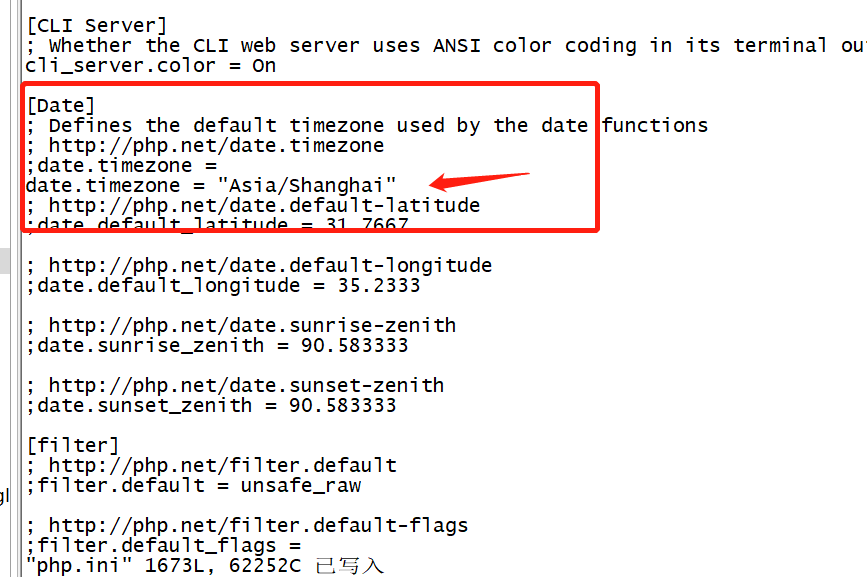
登录成功后,按下一步时出现了错误

修改php.ini文件
[root@localhost rh-php72]# pwd
vim /etc/opt/rh/rh-php72/php.ini

再次重启php,刷新浏览器
systemctl restart rh-php72-php-fpm.service
参考:https://cloud.tencent.com/developer/article/1976214
显示中文乱码解决方法
在zabbix-server服务器上安装如下文件符集
yum install wqy-microhei-fonts
替换linux上默认的字符集
cp /usr/share/fonts/wqy-microhei/wqy-microhei.ttc /usr/share/fonts/dejavu/DejaVuSans.ttf
重启zabbix-server,查看乱码是否解决